
Whether your child practiced indoor baseball or you tried to hang a picture and ended up with a tiny hole, these are the easiest and least expensive drywall damage to repair. Spackle, a putty knife, and sandpaper can be covered and made almost undetectable. Check out Drywall Repair Las Vegas for more details.
 Start by cutting a new patch to the same size as the hole. Use a utility knife to cut around the patch’s edges, then apply a layer of joint compound over it. Drywall cracks can make homeowners feel nervous. But if you’re not careful, the cracks can lead to more problems like water damage. Is the house going to collapse? What can I do about it?
Most drywall cracks are caused when two sheets of drywall meet. They aren’t meant to move, but if they do, it’s going to create a crack. So, the first thing you need to do is figure out what’s causing the movement. If it’s foundation shifting or natural settling, then it’s best to contact a professional drywall contractor to assess the issue.
Another common cause of drywall cracks is a moisture problem. A leaky pipe or chimney can cause sheetrock to saturate and develop an ugly browning and yellowing of the surface. Once the drywall is saturated, it begins to expand and crack just like a sponge or your mother-in-law soaking up Bellinis through sheer osmosis. The solution is to fix the source of the leak and ensure that all areas affected by the leak are properly repaired.
If the crack in the drywall is on a seam, start by widening it with a utility knife, paint scraper or chisel. This will help you determine if the crack extends past the paper tape and if it has pulled loose from the wall. If it does, then you need to peel back the tape and reapply it. Then, use a razor knife to expand the crack through the wall surface and into the stud cavity (Images 1 and 2).
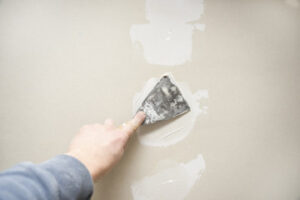
Now that you’ve widened the crack, apply a layer of joint compound to the entire area with your small putty knife. After the joint compound is applied, use a piece of fiberglass mesh drywall tape to wrap the crack and reinforce it. Then apply another layer of joint compound to the tape. After that, lightly sand the area and then prime and repaint.
If the crack is a long, straight vertical or horizontal line, it’s likely caused by improper installation. This might mean the wood studs weren’t adequately dried or could be a sign of structural issues.
Many types of holes can appear in drywall. From doorknob holes to cracks due to settling, the problems they cause can be more than just unsightly. They can also weaken the structure of the wall or ceiling. Taking care of these issues now can help prevent future problems, like water leaks and structural problems.
Small holes can often be fixed with a putty knife and drywall compound, but larger ones may require an adhesive patch kit. A drywall professional can help you determine the best way to repair your drywall.
If you are repairing a hole in drywall, first try to square it up by using a framing square and a utility knife to cut the area in a more rectangular shape. Always be careful when cutting into a wall; there could be electrical cords and plumbing running through it. If you aren’t sure, shine a flashlight into the hole to see what is there before you cut.
Once you have the hole squared up, cut a piece of drywall that is about twice as large as the hole. Trace the shape of the hole onto the back of this piece with a pencil or by making an indent with your finger around the edges of the shaped drywall (this is much easier to do when the paper is on). Once you have the shape traced, cut deeper into the drywall but be sure to leave the front paper intact. Snap off and peel away the excess drywall chunks.
When you are ready to patch the hole, use a putty knife to spread a thin coat of joint compound over the area. Be sure to smooth and feather the edges of the drywall so it blends in with the rest of the wall. Let the compound dry completely before proceeding to paint or hang anything on the wall.
If you have multiple rooms that need repairing, it is sometimes cost effective to hire a professional to take care of them all at once. This can save time and money, especially if they are all needing the same type of repair.
Mold grows where there is moisture, and drywall is a very porous material. Mold spores can become airborne, and they can damage other materials in the house, including carpets, furniture and — if not properly cleaned and removed – the structural integrity of wood beams and joists. If the mold is widespread, professional help may be needed to clean up and repair all affected areas.
To prevent mold spores from spreading, cover any surfaces that will not be worked on with plastic. For doors and windows, use blue or green tape to seal off the area around them, and make sure that the air can be vented outside while you work. It’s also a good idea to have a fan running in the room to exhaust the mold spores as they are killed, so that you don’t inhale them throughout your house (especially important for anyone with allergies or asthma).
If the drywall is not yet covered by paint, spray it first with a solution of equal parts bleach and water. This will kill any surface fungus and stop it from growing back, but it won’t penetrate the drywall to where the roots of the mold are causing it to grow inward. For this reason, if the mold is deep inside the wall, it’s usually necessary to replace the entire section of drywall.
A professional drywall company should be called to replace damaged drywall in any case, but especially when it involves black mold or any other type of toxic mold. In addition, professional assistance may be needed to fix leaks or other problems that are contributing to the growth of mold.
A reputable drywall contractor should be able to perform this kind of specialized task in a timely and cost effective manner. In some cases, the work can be done by an experienced homeowner, but larger projects or those that involve structural damage are best left to professionals. For the most part, any repairs involving water damage or a leak should also be handled by a professional plumber and possibly a hazardous materials specialist to ensure that the problem is completely resolved.
Drywall is thin, and it easily becomes distorted by moisture. Whether from a plumbing leak, roof leak, major water spill or flooding from natural disasters, drywall can quickly begin to deteriorate and develop long hairline cracks. In some cases, these small cracks can lead to serious structural problems for your home’s walls and ceilings. Depending on the extent of the damage, it’s important to address them right away to prevent further problems.
In addition to affecting drywall, moisture can also cause mold and mildew. If left unchecked, these can create a toxic environment for you and your family to live in, as well as spread to other areas of your home’s infrastructure. If the mold is severe, you should call in professionals who have training and experience remediating hazardous mold infestations.
Once the source of the moisture problem has been addressed, you’ll need to fully dry the wall before repairing it. This process can take days, especially if the area is large or contains many areas of wet drywall. To speed up the drying process, you can drain the water if necessary and use fans to circulate air in the room. A dehumidifier may also help if humidity is high.
Drywall damaged by water will often show signs that it’s a problem, such as swelling or sagging. It will also have a darker color than normal because of the moisture that saturates the porous material.
It’s important to assess the extent of the damage by using a moisture meter, or having a professional water restoration company do so. Any reading above 1 percent is likely a sign of compromised drywall.
Once you have repaired the damaged drywall, you can apply a textured coat to hide the taped seams and any other unavoidable blemishes that are visible on the surface of the wall. This coating will also help to protect the drywall from further damage in the future. The cost of this step is generally about $1 per square foot. It’s also possible to purchase pre-made textures to make this job faster and easier.